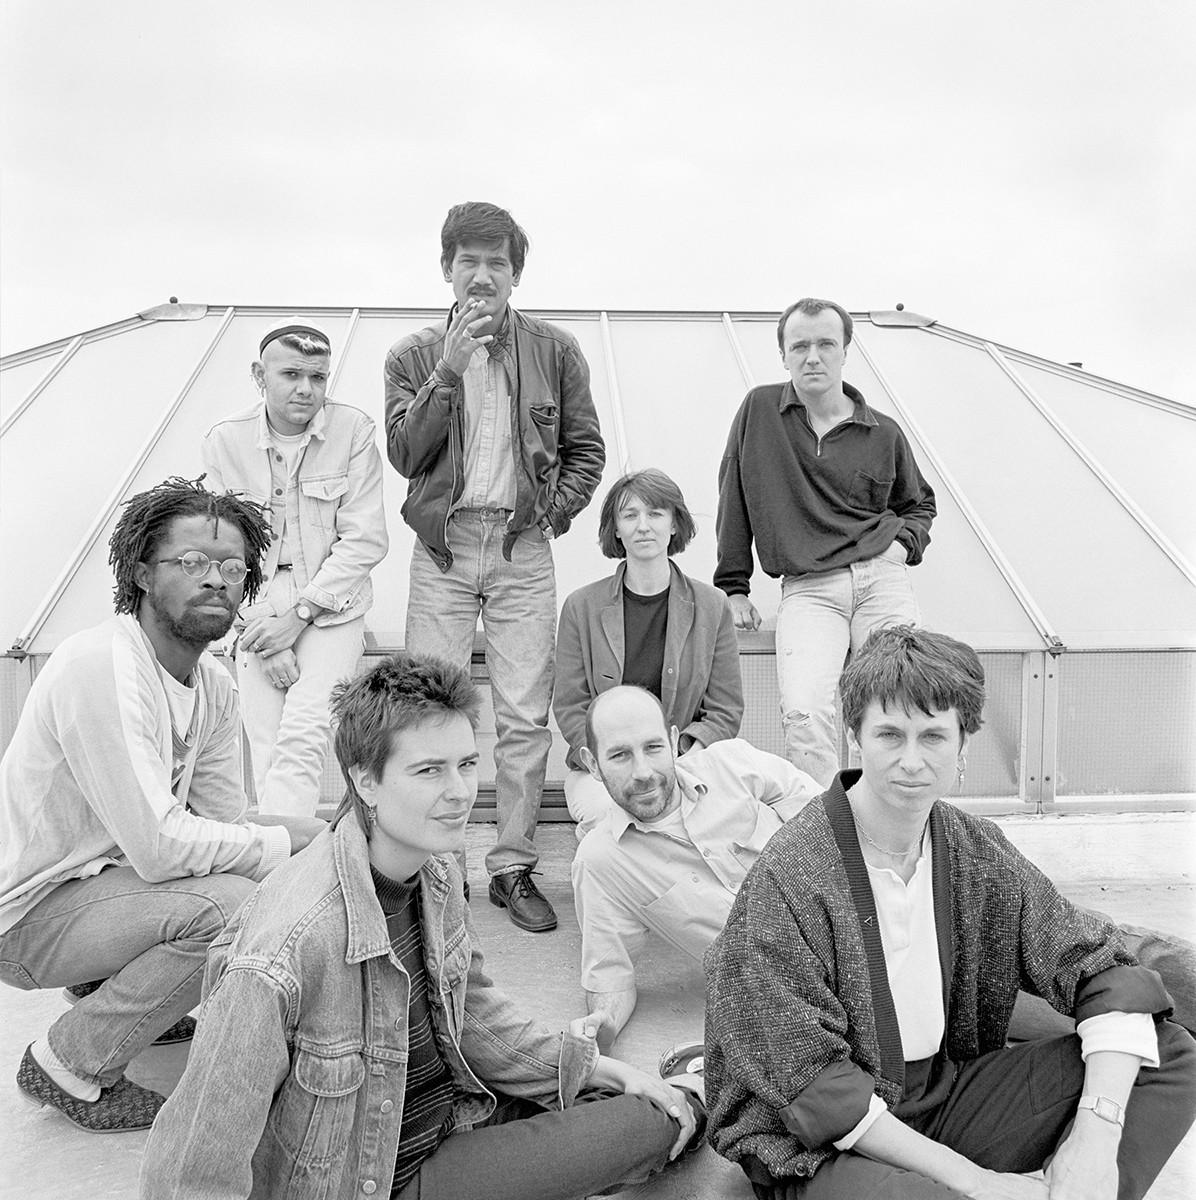
The two things happened simultaneously, learning about activism and learning to make a photograph. – Sunil Gupta
Aperture announced the relaunch of Aperture Ideas—an essential series of books devoted to the finest critical and creative minds exploring key concepts in photography—with the publication of Sunil Gupta’s We Were Here: Sexuality, Photography, and Cultural Difference.
In 2004 the cultural theorist Stuart Hall credited Gupta with being a photographer whose images had changed what was possible to see and desire in a queer, postcolonial world. Yet until now, the formative role that Gupta’s writing has played in his practice has been less widely known. Often working in moments of political pressure and publishing in diverse places––including ephemeral media such as magazines and community newsletters¬¬-—Gupta’s work over the last fifty years speaks to his talent as a prolific, insightful, and witty writer.
Divided into four chronological sections, and introduced by the editor and art historian Theo Gordon, We Were Here charts how Gupta’s concerns have developed over decades and through the course of shifting personal and political circumstances.
In his writing about public gay identities in Montreal and New York in the early 1970s, the furtive silence around homosexuality in Indian cities, the AIDS crisis, the Black Arts Movement, and key figures including Joy Gregory and Robert Mapplethorpe, Gupta foregrounds the power of cultural activism across continents, and illuminates the essential connections between queer migration and self-discovery. Continually questioning given forms of identity, Gupta offers artists and curators multiple strategies of resistance, carving out space for new ways of imagining what it might mean to live, love, and create.
Sunil Gupta (born in New Delhi, 1953) is a photographer, curator, writer, and activist. After migrating to Canada at the age of fifteen, he was educated in photography at the New School, New York, and the Royal College of Art, London. Gupta’s diasporic experience of multiple cultures informs a practice dedicated to themes of race, migration, and queer identity—and his life is a point of departure for photographic projects, born from a desire to see himself and others like him represented in art history. A curator of numerous exhibitions, Gupta has presented his photography internationally and his work is the subject of several monographs, including Christopher Street, 1976 (2018), From Here to Eternity (2020), Lovers: Ten Years On (2020), and London ’82 (2021). He lives and works in London.
Aperture Ideas: Artists and Writers on Photography, a series of essay collections devoted to essential voices in the field, includes bestselling titles by Geoff Dyer, Philip Gefter, Vicki Goldberg, Fred Ritchin, and David Levi Strauss.
We Were Here: Sexuality, Photography, and Cultural Difference An Aperture Ideas Book Selected Writings by Sunil Gupta ¼ × 8 ¼ in. (13.3 × 21 cm) 200 pages 26 duotone images Paperback Design by Pacific ISBN 978-1-59711-528-5 US $29.95 / CDN $41.95 / UK £22.00 Limited-edition print available
Aperture Foundation 548 West 28th Street, 4th Floor, New York, NY 10001 www.aperture.org
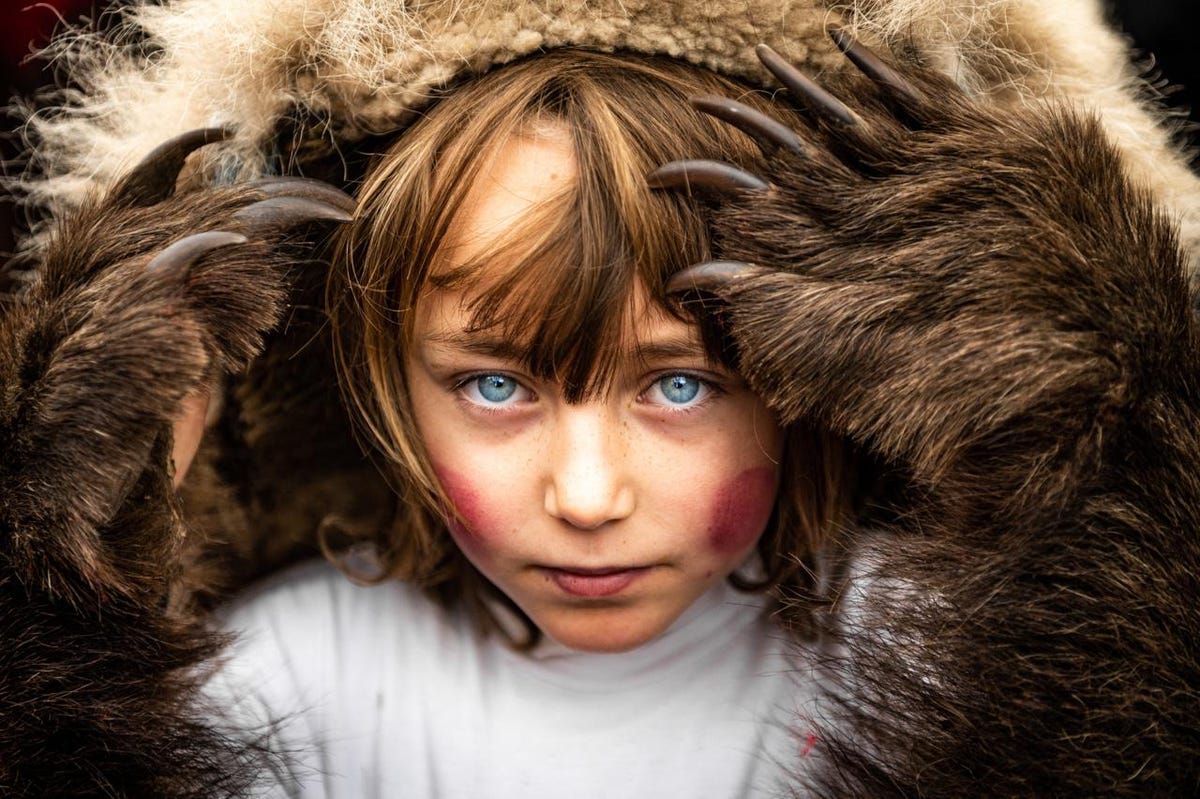
‘A Bear in the Backyard’ winner of the Fred Hazelhoff portfolio award. The youth also wrap … [+] themselves in bear skins during the winter bear festival.
Photo: David Hup – NPOTY Photo Contest 2022
The Nature Photographer of the Year (NPOTY) has unveiled the 2022 winners of its prestigious competition that were chosen from 20,952 images, submitted from more than 96 countries — a record for this contest.
The Nature Photographer of the Yearcompetition is an initiative of Nature Talks, the organization also responsible for the Nature Talks Photo Festival which takes place annually in the Netherlands
The 2022 title was given to photographer Dmitry Kokh from Russia for his ‘House of Bears” photos (below).
MORE FROM FORBESThe Amazing Winning Photos Of Nature Photographer Of The Year CompetitionBy Cecilia Rodriguez
“Dozens of polar bears have been making themselves at home in abandoned buildings on an Arctic Island and the photographer captured remarkable photos of the them peering through windows and standing on porches. The bears evoke the emotions of the audience effectively,” NPOTY explains.
‘House of bears’, Overall Winner and Winner of Human and Nature category
Photo: Dmitry Kokh, Russia – NPOTY Photo Contest 2022
The competition can be entered in 12 categories and also for the Fred Hazelhoff portfolio award — the latter was won by the Dutch photographer David Hup who, with Michiel van Noppen, created a powerful photo portfolio titled ‘A Bear in the Backyard’.
Open to professional and non-professional photographers of all ages from around the world, the competition registration began on December 27, 2021, for the Nature Photographer of the Year 2022 edition.
MORE FROM FORBESComedy Wildlife Photography Awards 2022: The Funny Winning ImagesBy Cecilia Rodriguez
Urban brown bears
The outstanding portfolio shows the life and interaction of the urban brown bear. The aim of this photo story is to document an often overlooked part of Europe: “In villages that lie in the shadows of the Carpathian Mountains, the presence of bears is clearly felt. Due to the illegal logging of the old-growth forests, their habitat and food become increasingly scarce. In search of food, they have to migrate from the ancient forests down to the villages, which regularly leads to conflicts with the inhabitants.
‘Dancing Bears’, Part of ‘A Bear in the Backyard’ photo portfolio, WInner of the Fred Hazelhoff … [+] Award
Photo: David Hup and Michiel van Noppen, Netherlands – NPOTY Photo Contest 2022
“Outstanding portfolio that shows the life and interaction of the urban brown bear. Using stunning colors, creative use of light and shadow, wide angle lens, variations of environmental and closeup shots of single and multiple bears, the photos in this portfolio are both artistic and carry a strong message, making people care about the animal,” explains judge Tin Man Lee about why this portfolio was selected for the Fred Hazelhoff Award.
In several towns around Transylvania, bears are honored every winter through the traditional Ursul (bear) dance. The troops from the village of Darmanesti perform at the annual festival in Comanesti. This is done to purify the land, drive away the evil spirits and welcome the new year.
‘Via the graveyard’, part of “A bear in the backyard’ Portfolio category, WInner of the Fred … [+] Hazelhoff Award
Photo: David Hup and Michiel van Noppen, Netherlands – NPOTY Photo Contest 2022
Via the graveyard, situated between the forest and the village, this bear leaves the protection of the forest in search of food.
The exceptionally dense bear population in Romania is a result of the Communist era when Nicolae Ceausescu was in power and banned bear hunting – a ban from which only he and his guests were exempt. As a result, Romania now has around 6,000 bears, which is half the European population.
“The problems of the coexistence of bears and humans have now become a priority on the political agenda, but the debate on the right course of action is very complex due to the many parties involved,” Hup explains. “And while discussions continue, conflicts keep arising: Shepherds lose sleep trying to protect their sheep and bears continue to break through fences to feast on scraps.”
‘The World is Mine’, Winner Mammals category, Ladakh region, Indian Himalayas
“The mystery surrounding the snow leopard always fascinated me,” Fonseca says. “They are some of the most difficult large cats to photograph in the wild. Not only because of their incredible stealth, but also because of the remote environment they live in.
“This photo of the highly endangered Snow Leopard is of amazing value,” said juror Karin Van Couwenberg. “The jury was convinced that the years of preparation resulted in a great photo. That is camera trap photography at its best as far as we have seen.”
‘The Rain I’ve been Waiting for’, Winner Underwater category
Photo: Kazushige Horiguchi, Japan – NPOTY Photo Contest 2022
“This split image combines two different moods, taking place at the same time above and below the water,” said juror Marco Gaiotti. “A dark, stormy landscape above the water contrasts with the apparently calm and still life underneath the surface, depicting toads laying eggs. The raindrops touching the water surface are the contact point between these two different worlds.”
‘Cold and warm’ Winner Plants and Fungi Category
Photo: Soare Laurentiu, Romania – NPOTY Photo Contest 202
For jury member Tin Man Lee “this image is full of the dynamic power of warm and cold. The complementary color, lines, and pattern create harmony. The fog adds mood to the excellent shot.”
Juror Myriam Dupouy explains why the judges selected this image of the Urban Kittiwakes as the winner of the Birds Category: “In a way, it’s a simple scene, but it throws you in the role of a respectful, invisible witness, as nature photographers should always be.
The point of view through a window is an interesting one. The light casts attention to simple yet tender moments. A strong photographer’s eye and a wonderfully sneak peek into an intimate moment.”
“This small owl in the center of the composition, depicted by a wide-angle lens, is perfectly inserted inside the surrounding environment. The leaves on the ground, the trees in the background, and the light filtering through the woods, all combine for the perfect setting of the tiny bird,” says juror Gaiotti about the winning image in the Youth category.
‘Otter in ice-hole’, Winner Black and White category
Photo: Ernst Dirksen, Netherlands – NPOTY Photo Contest 2022
Jury member Stefan Gerrits explains why this image of an otter has been selected as the Winner in the Black and White category: “This image has a surplus of geometrical circular shapes, which makes it not only funny but very attractive.
There is the pitch-black dark circle of the hole in the lake and the half circle consisting underwater ice bubbles. The judges liked the fact that the hole is placed in the upper right corner, giving the covered body of the otter enough space under the ice.”
‘Coot’ Winner Nature of “De Lage Landen” (Low Lands) category
“Coots are medium-sized waterbirds often swimming in open waters. The angle is an excellent choice and the leading lines made for an intriguing feel,“ says juror Karin Van Couwenberg about the winner in the Nature of “De Lage Landen” category.
‘An Adaptation for Death’ winner Other Animals category
Photo: Bernhard Schubert, Austria – NPOTY Photo Contest 2022
All kinds of benthic invertebrates are crowded together in the final remaining milky puddle of a soda lake.
One of those tiny creatures sticks out as it’s larger and has a distinct shiny blue egg sack. Branchipus schaefferi is the species name and it belongs to a group known as fairy shrimps.
They depend on periodically drying water bodies. When those dry up, most of the small crustaceans have already dispatched their eggs and they die. Their eggs can survive for centuries in the dry ground until they get flooded again and hatch.
In spring, the soda lakes are typically filled with water, containing masses of fairy shrimps which are an important food source for migrating and breeding waterbirds.
However, those soda lakes are at high risk due to rising spring temperatures which lead to faster evaporation and continuously-dropping groundwater levels, probably caused by the extensive watering of surrounding agricultural area.
With time, this enables nutrifying plants and shrubs to grow on this ecologically valuable area. Their roots penetrate the sealing layer of the soda lakes which leads to an even faster loss of water and will finally lead to a shrub encroachment of the former soda lake.
“Some of the invertebrates here, called ‘fairy shrimps’ have made it through the ages but are now in danger due to climate change and water-demanding agriculture. And with them also migrating birds feeding on them. It is an image that stops you and make you think,” says juror Dupouy.
“Compositions and lights are of course the most important elements when it comes to landscape photography,” explains Gaiotti. “We have seen many images taken by drones and being awarded because they offered a new point of view. In this case, this technology was used to offer an unusual point of view in combination with a sapient composition and great lights.”
Trees and stars, Winner Nature-Art Category These star-shaped cracks appear on the surface of the … [+] ice.
“Lots of drama in this black-and-white image with the star-shaped cracks on ice cap surface, or rather sky in this case, getting larger in size. The dynamic, blurred, tree line gives this image a clear perspective. Great use of new technologies, imagination and post processing,” says Gerrits.
Runner Ups and Highly Commended
‘Iberian lynx family portrait”, Highly Commended, Animal Portraits category
‘Gemsbok in light – The descent’, Runner-Up, Black and White category.
Photo: Craig Elson – NPOTY Photo Contest 2022
‘Flamingo airport’, runner up, Human and Nature category
Photo: Tamani Cédric – NPOTY Photo Contest 2022
“As we were flying over the salt mines near Swakopmund in Namibia, I was in awe of the beautifully saturated colours below us.,” says Cédric. “When a group of flamingos was just below us, the magic was perfect. Flamingos stay in salt mines, because they find food like crayfish, mollusks and insects or seaweed.
‘Like a fun shadow puppet show’, Highly Commended, Black and White category
Photo: Irma Szabó- NPOTY Photo Contest 2022
‘Footprints in color’, Runner-Up, Nature Art category
Photo: Juan Garcia Lucas – NPOTY Photo Contest 2022
‘High jump’, Highly Commended, Mammals category
Photo: Zsolt Moldovan – NPOTY Photo Contest 2022
‘Pygmy Owl’s first flight’, Runner-Up, Youth (11 – 17 years old) category
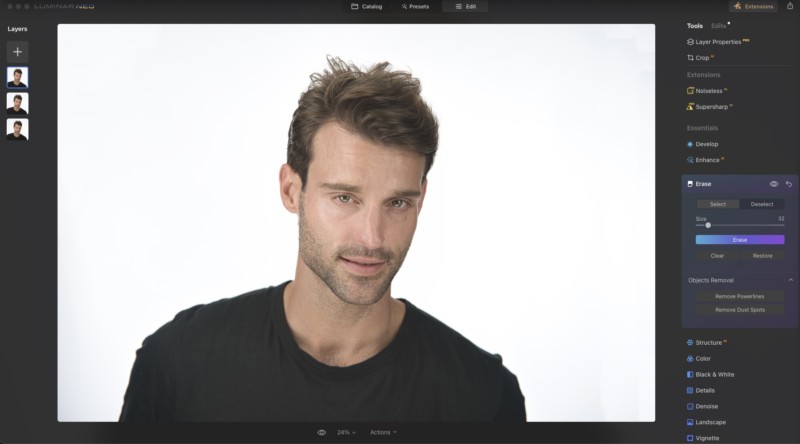
Portrait retouching can get overwhelming sometimes with the steps you need to take to make your shots look absolutely perfect. Maybe these steps aren’t that hard, but they can definitely be very time-consuming, so finding any way to speed this process up to make better and more efficient use of your time is a high priority for every photographer. Using Luminar Neo to tackle these steps can make retouching a breeze using just a few tools and leveraging some of the Artificial Intelligence (AI) built into the application.
Full disclosure: This article was brought to you by Skylum, the software company behind Luminar NEO.
Luminar Neo is a surprisingly diverse and versatile application that can help photographers do incredibly advanced work from everything including star trails and astrophotography to composite work, breathtaking landscapes, and incredible portraits. Taking advantage of the advanced retouching tools within Luminar Neo can help editors speed up their work, as well as take a lot of the tedium out of the process. Users can leverage a powerful “slider” based editing system for a large portion of the work that would normally require detailed and pin-point pen/mouse work to complete.
The Essentials
The first thing to do is bring your images into the catalog of Luminar Neo either by importing or simply adding an existing folder on your computer into the system. Once the folder and images have been added to the catalog, select an image from the batch you want to edit and either start with a preset (if you choose), or just jump directly into the EDIT tab and start manually adjusting the image to meet your needs starting with the “essentials” section.
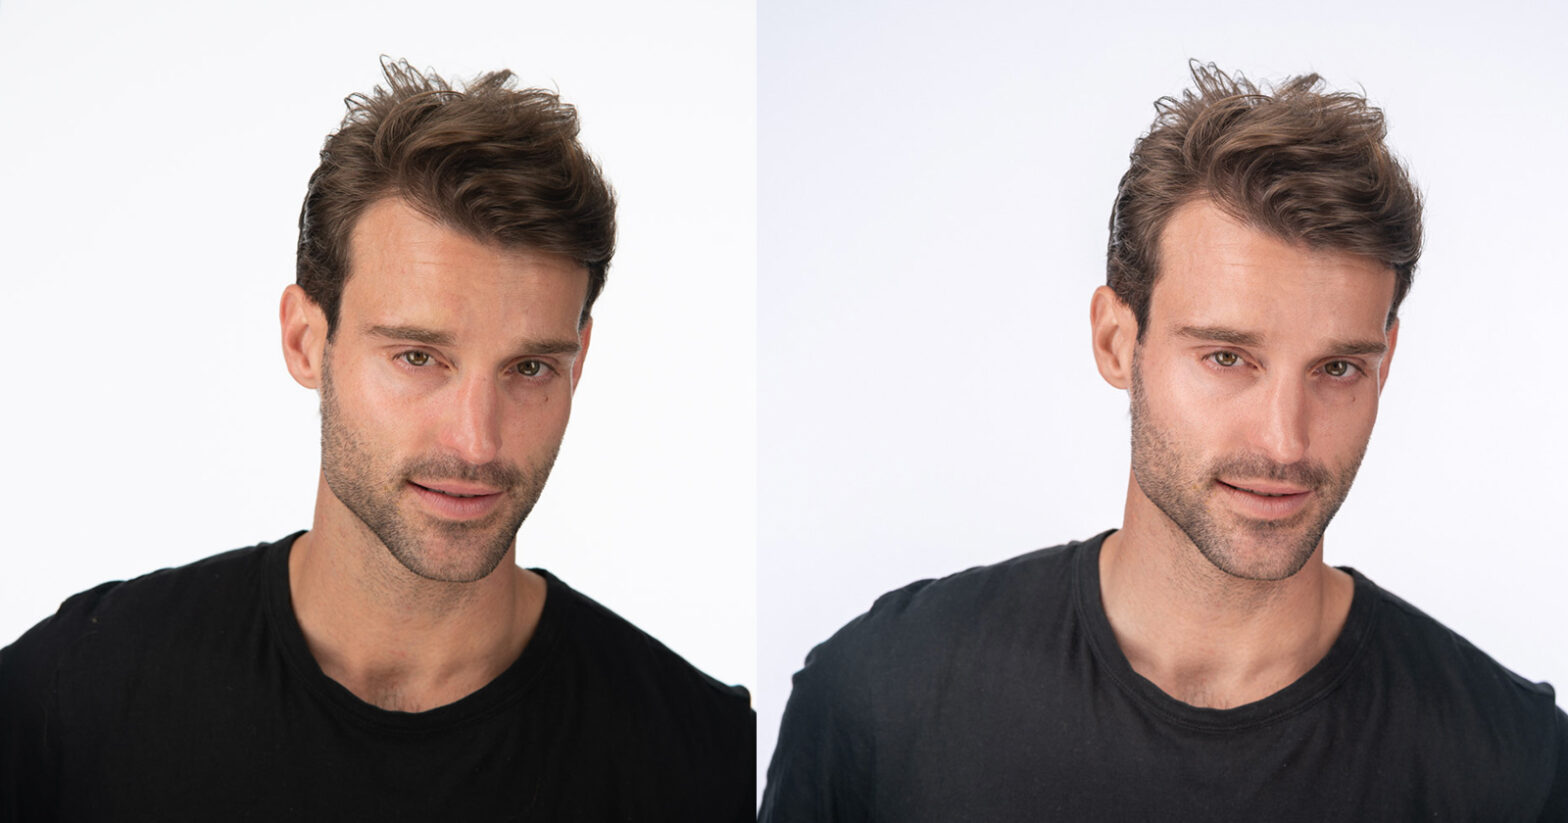
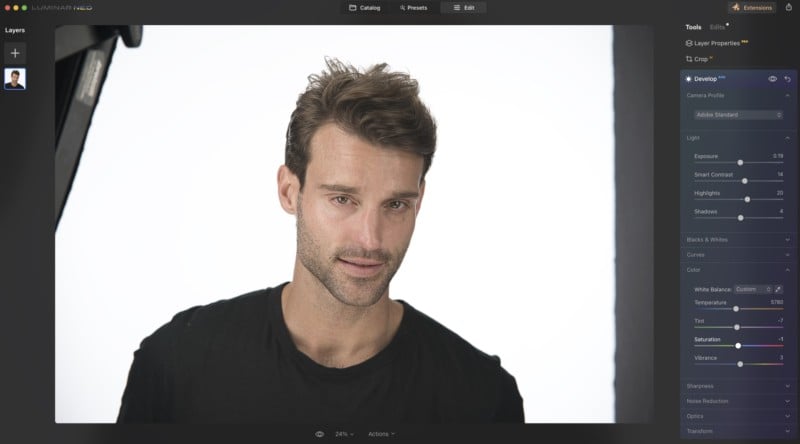
It might actually be best to start with using the Structure and Enhance AI tools to start as these tools will help users automatically make adjustments to the highlights, shadows, contrast, tone, saturation, and exposure of the image for you. The powerful AI tools within Luminar will analyze the image and make some of the basic and most fundamental decisions in your image edits for you here, making it easily the smartest way to start editing your image. For these edits, we kept things a little more natural, using the Accent AI set to about 22 (out of 100) with an even smaller bump in the Structure AI slider (about 8).
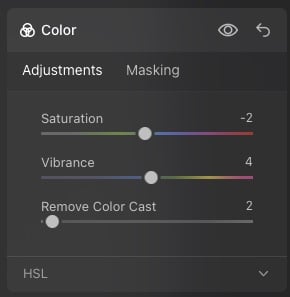
After starting with the AI tools, the next step is to open the Develop section where users will find most of the tools they are familiar with from other editors like adjustments to highlights, shadows, contrast, exposure, white balance, lens optics corrections, and even sharpening and noise reduction. These will apply globally to the image and are a great place to start to get the photograph looking the way you want after using the AI tools. For me, I just boosted the shadows a little to get a little more light on the dark areas of my image, and added a little more contrast with a quick tweak to the white balance to even things out. Finally, from the COLOR tool, since this is a headshot, I lowered the saturation about -2 and bumped the vibrance by about +4 while removing the Color Cast by about two points. While subtle, this helped me dial back the red/orange tones in the skin slightly without having to go in and manually make adjustments to each Hue/Saturation slider.
(Obviously this doesn’t apply to my current photograph, but with outdoor portraits or maybe if my lens/sensor was dirty and had some dust spots on it, this would also be a good time to use the ERASE tool to automatically remove the dust spots and power lines from the image.)
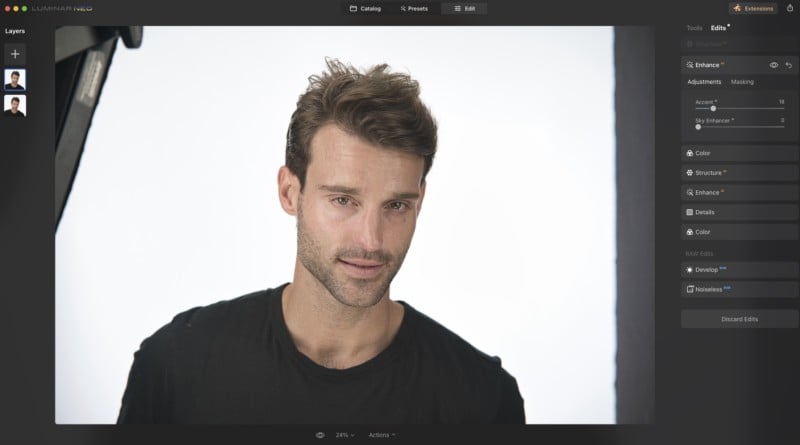
Improving Skin Tone And More With AI
Now we get into the more portrait-specific tools like the Face AI and Skin AI tools to help correct skin tones, remove shine, adjust the lighting specific to the face, and even reshape the face and body if that is needed or requested by the clients. In this particular instance, since we’re working with a bearded male model who has pretty good skin to begin with, we don’t need to go too heavy on the Skin and Face AI tools.
To help save time from dodge & burning and frequency separation/color adjustments, I simply bumped the Skin adjustments by about 10 on the slider to even the tones out while keeping the skin texture very natural (aka rugged) but bumped the Shine Removal up to 35 since I didn’t want the highlights on his face for this particular look.
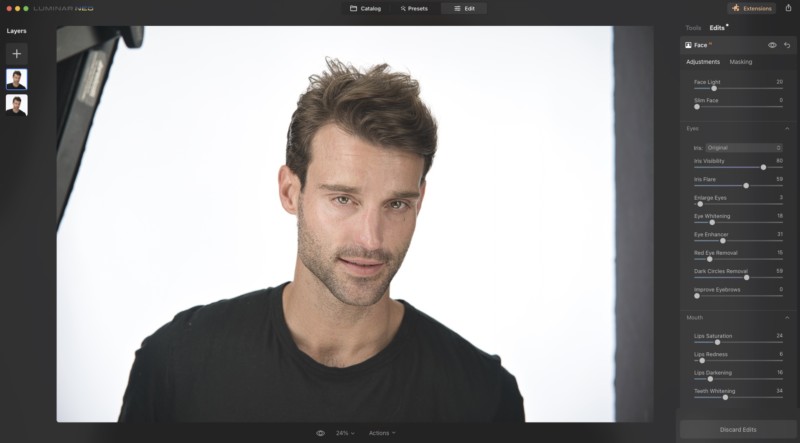
Since this is an actor headshot, the next adjustments were with the Face AI tool where we bumped the Face Light up slightly, made the eyes pop while removing the “red eye/vessels” slightly, and significantly reduced the dark circles (a task normally tacked through manually dodge and burn in Photoshop, but was a simple 3-second adjustment with Neo).
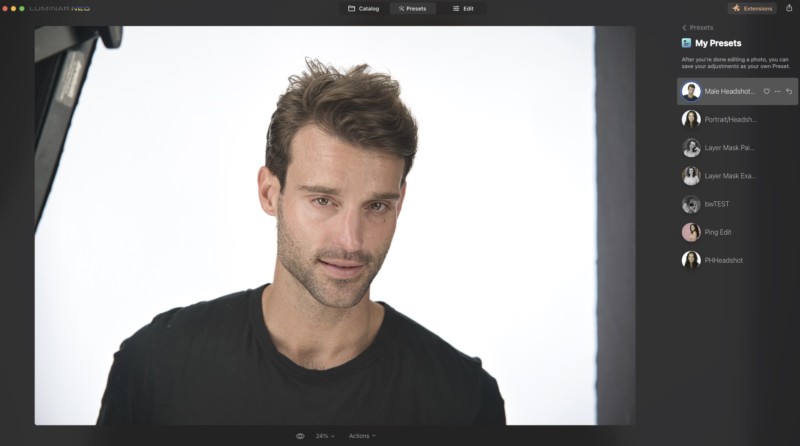
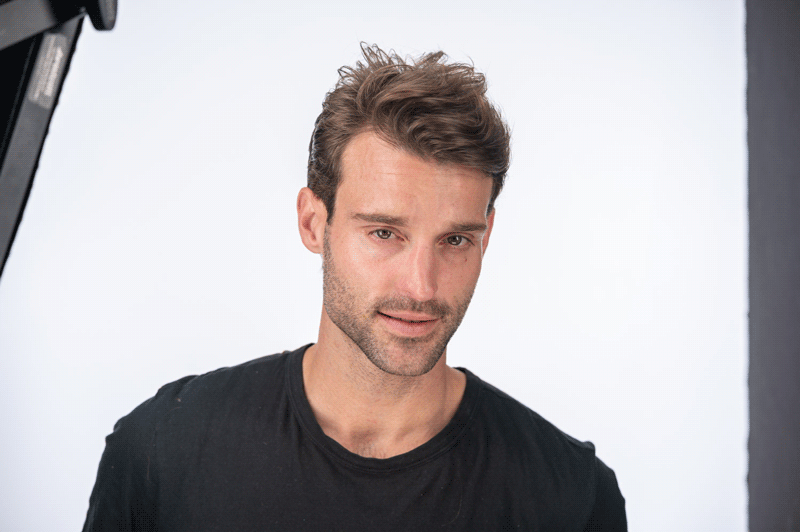
This effectively wraps up the “basic” edits for the headshots taking us from raw to a very refined image, which the edits can be saved as a preset and applied to the rest of your session which I’ll explain in more detail a little further below.
Applying Edits to the Entire Session
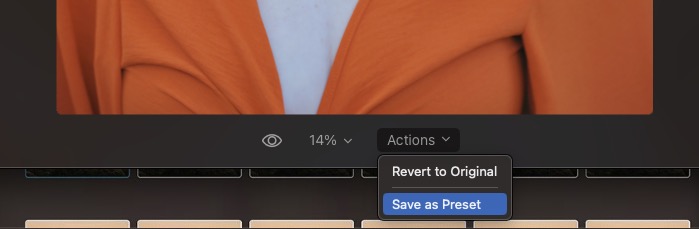
After you have made the adjustments you want to the brightness, skin tones, colors, and more, you can even save these adjustments as your own custom preset by clicking Actions and clicking SAVE AS PRESET which is located at the bottom of the Edit screen below the image you will be working on. Just be sure to name it properly as you cannot make changes to it once it has been saved. The good news is there is no limit to the number of user presets that can be manually created for the app, meaning you can create custom edits for pretty much every conceivable setting.
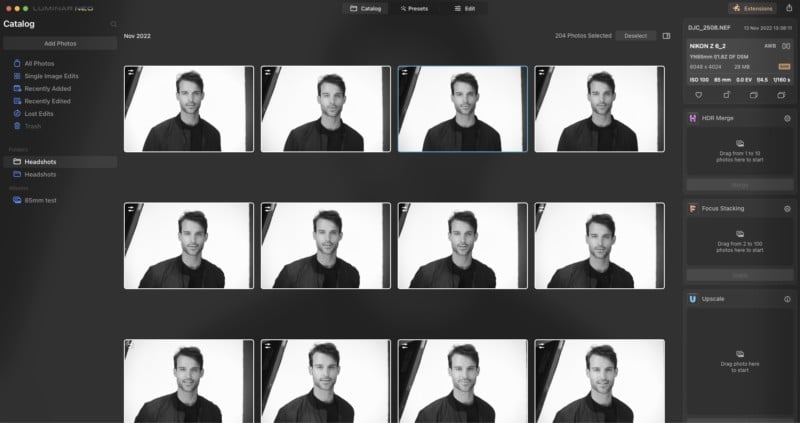
From here, if you have multiple headshots you need to edit, you can save some time by taking this preset and applying it to the rest of the images from your session, making it easier when culling to choose which images you want to continue working on, and obviously save a lot of time and steps by already having the “Basics” of your editing session done and applied to all of the photos.
You can apply this preset, or the adjustments as a whole, by viewing the session from the Catalog view in Luminar Neo, copying the adjustments from the image you are working on, selecting the rest of the session, and selecting Sync or Paste adjustments (from the right click dropdown menu) to the rest of the images.
Depending on the number of images and complexity of the edits you have made, this process could take a few minutes depending on the speed of your computer, once it completes you will notice that all of the thumbnails have updated to reflect the changes made to the batch.
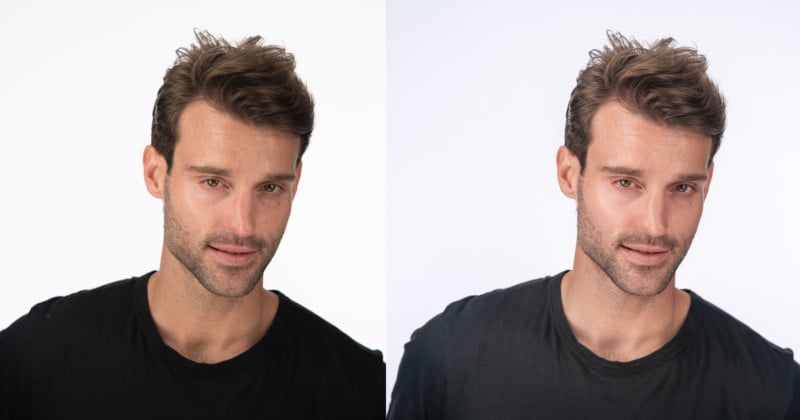
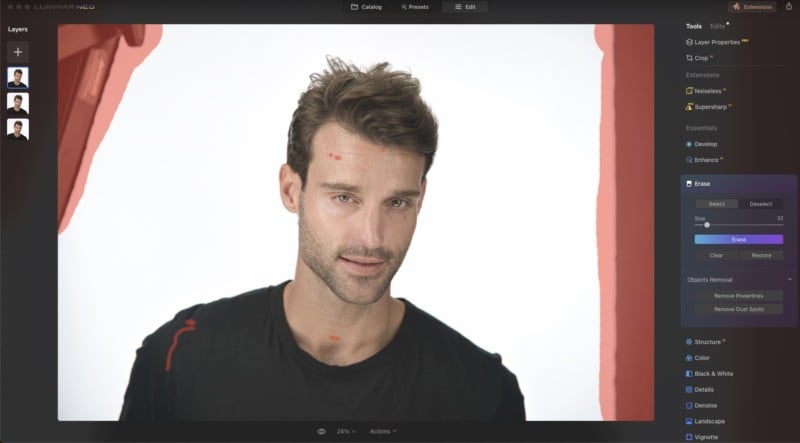
Cleaning Up and Finalizing The Shot
Now that we’ve applied the base edits to the session as a whole, it’s time to work on the fine details of the individual images you want to edit and finalize. The first thing we need to do in this headshot is clean up the cluttered background. We do this by simply selecting the ERASER tool from the essentials section. This kind of acts like a real-life magic-eraser (aka content aware) where we’ll mask over the objects in the image we want removed. In this case, it’s the edge of the v-flat and lights in the corners of the shot we want taken out.
Just click “Erase” after the selections have been made, this can include fixing “blemishes” and even fabric and hairs on clothing if needed to have the system remove those problems and distractions from your image.
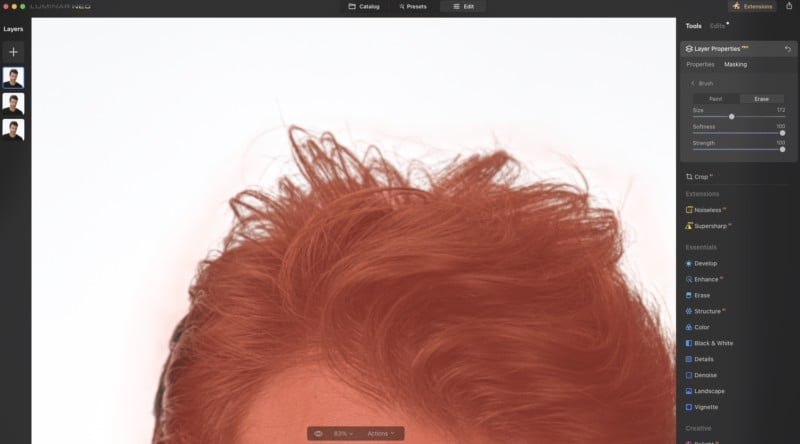
In just seconds, the erase tool will remove unwanted elements from your image, including skin blemishes leaving you with a near-perfect shot with just minor details left to adjust. In the portrait and headshot scenario, users will often have some stray hairs they need to have cleaned up. To do this, you can either spend some time doing additional micro-erase tool work, or you can use the “Mask AI” tool found in the Structure tool and select “human” to show the resulting mask it created.
Sometimes the mask isn’t 100% perfect, but it’s rather easy to clean up simply by backing out of the MaskAI and selecting the BRUSH tool and “SHOW” to ensure we can see the mask. Then just simply add or remove sections of the mask to make sure it’s covering exactly the area you want for your next steps of the edit. Using the mask tool here can allow us to eliminate any stray fly hairs we don’t want in the image by removing them from our “human mask” and then clicking INVERT on the mask actions and pulling the structure details down. Since we have a solid and clean background, this is a very easy way to deal with stray/fly hairs in the image, leaving you with a clean, crisp headshot at the end.
All that’s left to do is to export the final edit in the format of your choice and that’s it, you’ve edited a portrait from start to finish using Luminar Neo and its advanced AI tools.
Full disclosure: This article was brought to you by Skylum, the software company behind Luminar NEO.
Insta360 has announced that its Insta360 RS 1-Inch 360 camera is now compatible with Matterport Virtual Tours. The new compatibility is available for iOS users now, with the Android version coming soon. The Insta360 RS 1-Inch 360 camera features a high-resolution camera that allows for 6K 360º video capture and 21mp 360 photos. Dual 1-inch CMOS sensors provide high-quality imaging and dynamic range, allowing for detailed shots even in low light and tight spaces. The camera also offers the ability to shoot RAW images and two HDR modes that can be used while shooting in RAW format. One of the standout features of the Insta360 RS 1-Inch 360 is its compact size, making it ultra-portable.
With this new compatibility, Insta360 RS 1-Inch 360 users can harness the power of Matterport to create virtual tours in stunning VR. The camera’s ability to capture high-resolution images and its dual CMOS sensors make it perfect for creating detailed and immersive VR experiences. Its compact size and intuitive app also make it easy to use, even for those who are new to 360-degree photography.
Insta360 is now offering a Virtual Tour Kit for $859.99, which includes the camera, a selfie stick, a lens cap, and a 64GB memory card. This makes it easy for users to get started with their VR tours right away. When it comes to the Matterport subscription, there is a free trial available so that users can try out the application and see what it has to offer. After the free trial, there is a ‘Starter’ subscription available for $9.99 a month.
For more information on the Insta360 RS 1-Inch 360 and its compatibility with Matterport Virtual Tours, visit Insta360’s website.
Wildlife Photographer of the Year People’s Choice Award Shortlist – A golden huddle by Minqiang Lu, China
Minqiang Lu
Nature is filled with countless stunning moments, and these photographers managed to capture a second of that majesty.
The Wildlife Photographer of the Year competition recently released their people’s choice award finalists for the 2022 contest. The Natural History Museum in London, which hosts the annual event, picked 25 photos out of the thousands entered into the competition as finalists.
The chosen shots include poignant peeks into how wild animals lead their private lives and how humanity’s actions affect every species on Earth.
To determine the winner of the photo competition’s people’s choice award, the Natural History Museum depends on the votes of animal lovers. Voting for the award is open until February 2. at the museum’s website for the Wildlife Photographer of the Year competition.
The winner and four runners-up will be announced on February 9. Those who would like to see the finalists’ photos in person can see all 25 of the shots, plus the other winners of the Wildlife Photographer of the Year competition, on exhibit at the Natural History Museum in London until July 2023.
RELATED: Ballet Dancers Perform with Adoptable Pets to Help Animals Find Homes for the Holidays
Read on to view the 25 photos from around the world that are up for the contest’s people’s choice award, and then vote for your favorite.
Hyena Highway by Sam Rowley
Wildlife Photographer of the Year People’s Choice Award Shortlist – Hyena highway by Sam Rowley, UK
Sam Rowley
Rowley captured a hyena scavenging for scraps left behind by humans on a roadway outside Harar, Ethiopia.
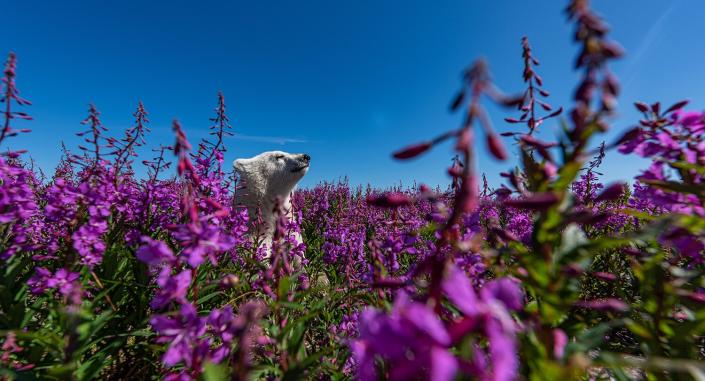
Among the Flowers by Martin Gregus
Wildlife Photographer of the Year People’s Choice Award Shortlist – Among the flowers by Martin Gregus, Canada
Martin Gregus
Gregus spied on this polar bear cub playing in a patch of fireweed on the coast of Hudson Bay, Canada.
That’s the Spot! by Richard Flack
Wildlife Photographer of the Year People’s Choice Award Shortlist – That’s the spot! By Richard Flack, South Africa
Richard Flack
Flack found a flock of crested guineafowl helping each other scratch hard-to-reach spots while foraging In South Africa’s Kruger National Park.
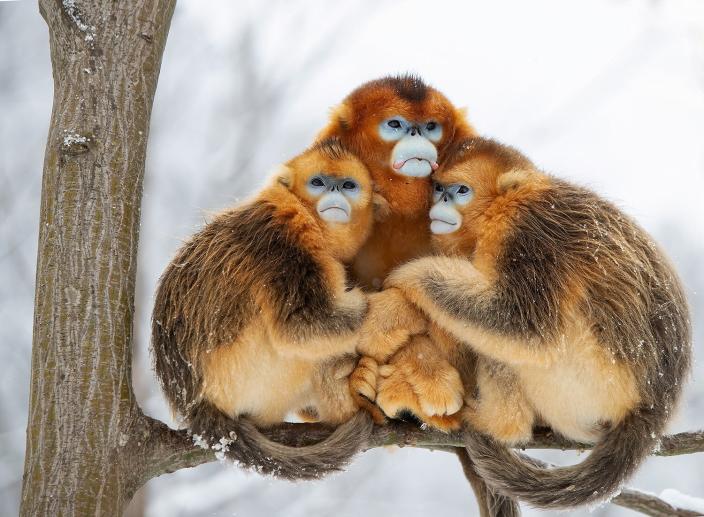
A Golden Huddle by Minqiang Lu
Wildlife Photographer of the Year People’s Choice Award Shortlist – A golden huddle by Minqiang Lu, China
Minqiang Lu
Lu found a trio of golden snub-nosed monkeys snuggling to stay warm in central China.
Fishing for Glass Eels by Eladio Fernandez
Wildlife Photographer of the Year People’s Choice Award Shortlist – Fishing for glass eels by Eladio Fernandez, Dominican Republic
Eladio Fernandez
Fernandez captured the now-regulated process that goes into catching the declining glass eel.
Caribbean Crèche by Claudio Contreras Koob
Wildlife Photographer of the Year People’s Choice Award Shortlist – Caribbean crèche by Claudio Contreras Koob, Mexico
Claudio Contreras Koob
Koob snapped these photos by lying in the mud and watching a flock of flamingos at the Ría Lagartos Biosphere Reserve on the Yucatán Peninsula, Mexico.
Wasp Attack by Roberto García-Roa
Wildlife Photographer of the Year People’s Choice Award Shortlist – Wasp attack by Roberto García-Roa, Spain
Roberto García-Roa
García-Roa caught a battle between a pompilid wasp and an ornate Ctenus spider on camera.
The Elusive Golden Cat by Sebastian Kennerknecht
Wildlife Photographer of the Year People’s Choice Award Shortlist
Sebastian Kennerknecht
Kennerknecht got a photo of the rare African golden cat with help from a camera trap.
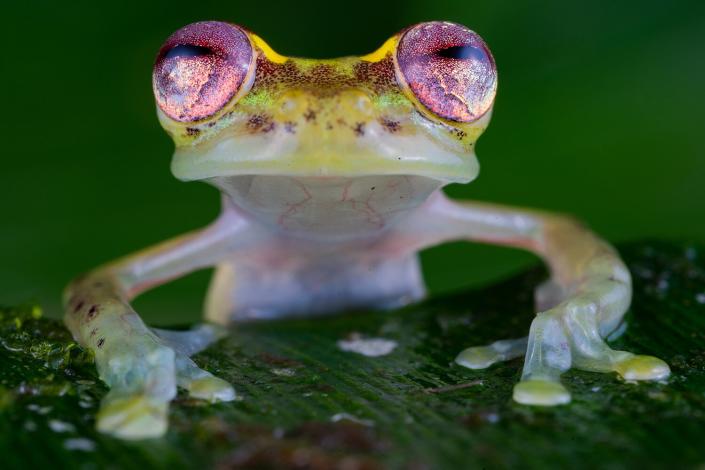
The Frog with the Ruby Eyes by Jaime Culebras
Wildlife Photographer of the Year People’s Choice Award Shortlist – The frog with the ruby eyes by Jaime Culebras, Spain
Jaime Culebras
Culebras photographed this Mindo glass frog at the Río Manduriacu Reserve in Ecuador.
Caught by the Cat by Michał Michlewicz
Wildlife Photographer of the Year People’s Choice Award Shortlist – Caught by the cat by Michal Michlewicz, Poland
Michal Michlewicz
Michlewicz captured a cat on the hunt in an abandoned barn in Radolinek, Poland.
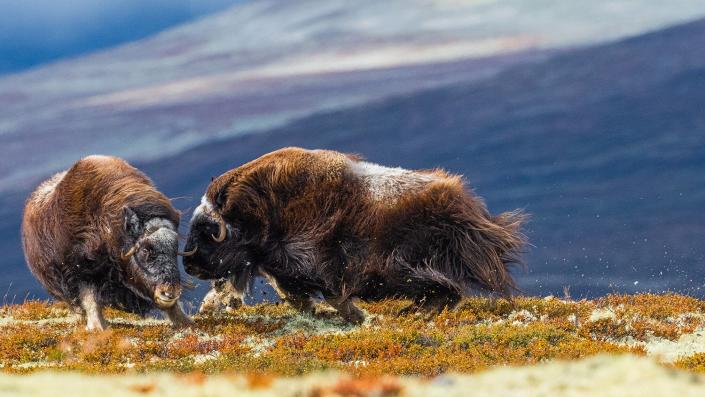
Head to Head by Miquel Angel Artús Illana
Wildlife Photographer of the Year People’s Choice Award Shortlist – Head to head by Miquel Angel Artús Illana, Spain
Miquel Angel Artús Illana
Illana was in Norway’s Dovrefjell-Sunndalsfjella National Park when two female muskoxen started fighting near the photographer’s lens.
Unlucky for the Cat by Sebastian Kennerknecht
Wildlife Photographer of the Year People’s Choice Award Shortlist – Unlucky for the cat by Sebastian Kennerknecht, USA
Sebastian Kennerknecht
Kennerknecht took this photo to show the complex relationship between the Andean cat and its human neighbors, who see the feline as a mountain guardian and a symbol of good luck.
Covid Litter by Auke-Florian Hiemstra
Wildlife Photographer of the Year People’s Choice Award Shortlist – Covid litter by Auke-Florian Hiemstra, Netherlands
Auke-Florian Hiemstra
Hiemstra’s photo shows a perch trapped in a surgical glove that was found discarded in a Netherlands canal.
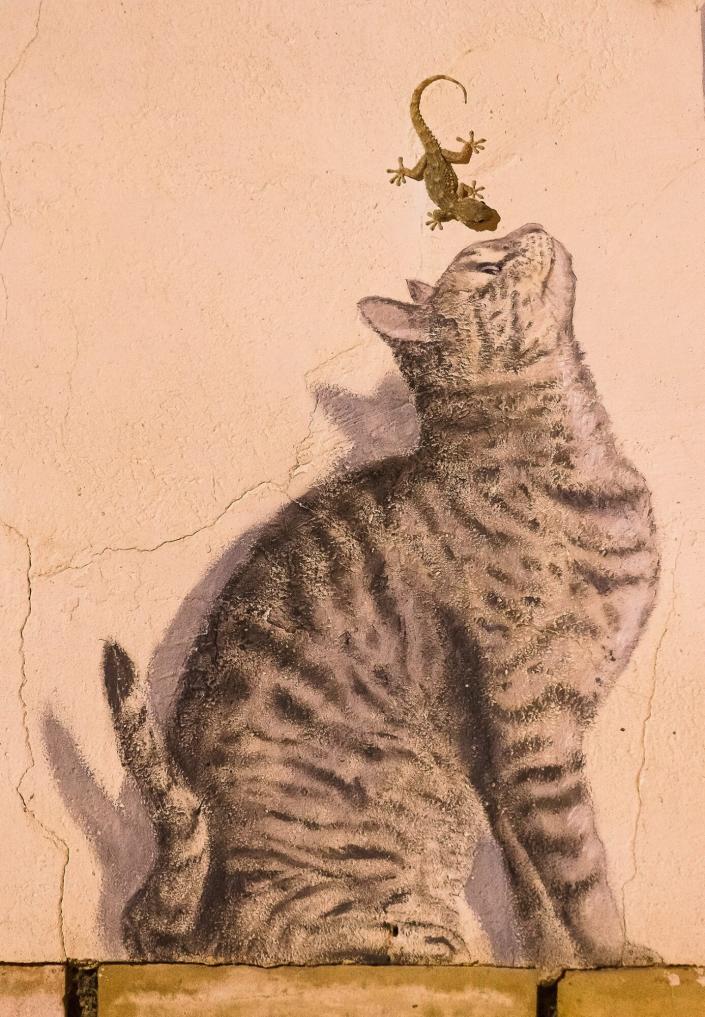
Life and Art by Eduardo Blanco Mendizabal
Wildlife Photographer of the Year People’s Choice Award Shortlist – Life and art by Eduardo Blanco Mendizabal, Spain
Eduardo Blanco Mendizabal
Mendizabal was in the right place at the right time to get this photo of a gecko interacting with cat graffiti in Corella, Spain.
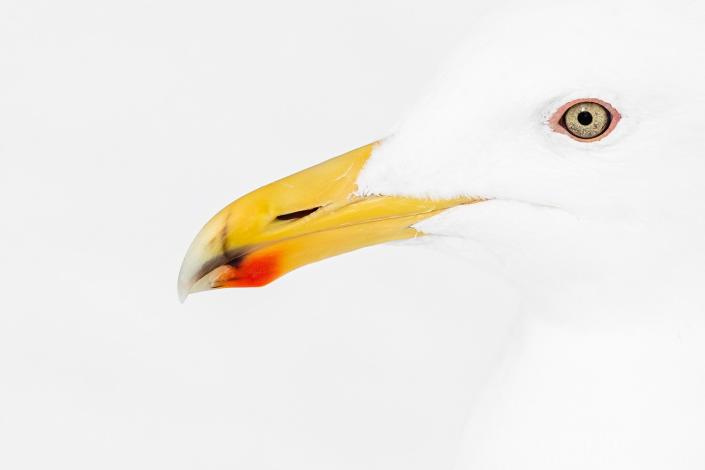
Red and Yellow by Chloé Bès
Wildlife Photographer of the Year People’s Choice Award Shortlist – Red and yellow by Chloé Bès, France
Chloé Bès
Bès photographed this gull near Rausu port on the Japanese island of Hokkaido.
Holding On by Igor Altuna
Wildlife Photographer of the Year People’s Choice Award Shortlist – Holding on by Igor Altuna, Spain
Igor Altuna
Altuna snapped the moment a leopardess killed a baboon and walked off with the primate’s living baby still holding on in Zambia’s South Luangwa National Park.
Heads of Tails? by Jodi Frediani
Wildlife Photographer of the Year People’s Choice Award Shortlist – Heads or tails? by Jodi Frediani, USA
Jodi Frediani
Frediani shot these northern right whale dolphins in flat, clear waters near Monterey Bay, California.
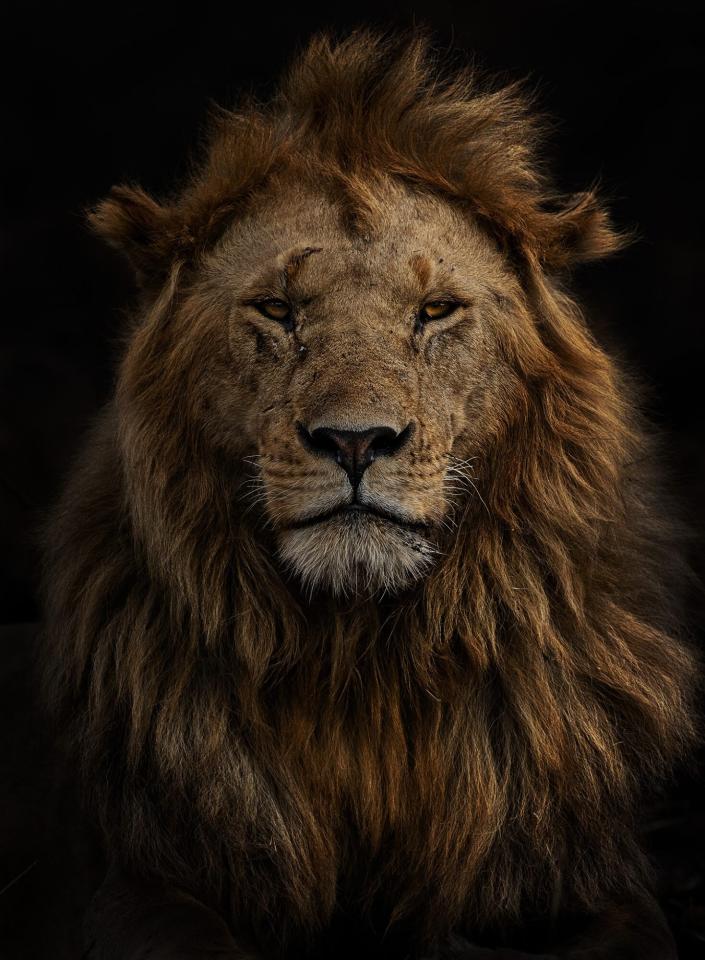
Portrait of Olobor by Marina Cano
Wildlife Photographer of the Year People’s Choice Award Shortlist – Portrait of Olobor by Marina Cano, Spain
Marina Cano
Cano photographed Olobor, a member of the Black Rock pride in Kenya’s Maasai Mara National Reserve, after a controlled burn in the area to stimulate new grass.
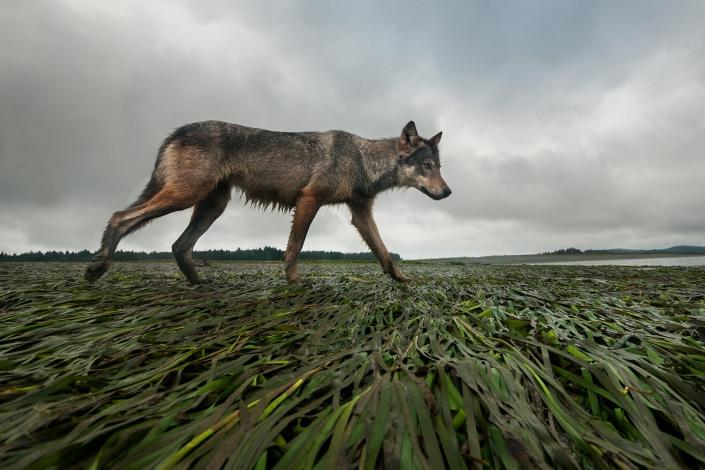
Coastline Wolf by Bertie Gregory
Wildlife Photographer of the Year People’s Choice Award Shortlist – Coastline wolf by Bertie Gregory, UK
Bertie Gregory
Gregory spotted this female grey wolf on the shoreline of Vancouver Island, British Colombia, Canada.
Night Encounter by Sami Vartiainen
Wildlife Photographer of the Year People’s Choice Award Shortlist – Night encounter by Sami Vartiainen, Finland
Sami Vartiainen
Vartiainen caught this badger heading out on a nighttime hunt near Helsinki, Finland.
Snowshoe Hare Stare by Deena Sveinsson
Wildlife Photographer of the Year People’s Choice Award Shortlist – Snowshoe hare stare by Deena Sveinsson, USA
Deena Sveinsson
Sveinsson was snowshoeing in Rocky Mountain National Park, Colorado when they spotted a snowshoe hare.
Fox Affection by Brittany Crossman
Wildlife Photographer of the Year People’s Choice Award Shortlist – Fox affection by Brittany Crossman, Canada
Brittany Crossman
Crossman caught a sweet moment between two foxes in North Shore on Prince Edward Island, Canada.
A Tight Grip by Nicholas More
Wildlife Photographer of the Year People’s Choice Award Shortlist – A tight grip by Nicholas More, UK
Nicholas More
More found this male Bargibant’s seahorse off the coast of Bali.
World of the Snow Leopard by Sascha Fonseca
Wildlife Photographer of the Year People’s Choice Award Shortlist – World of the snow leopard by Sascha Fonseca, Germany
Sascha Fonseca
Fonseca positioned a camera trap to get this photo of a snow leopard admiring the mountains of northern India.
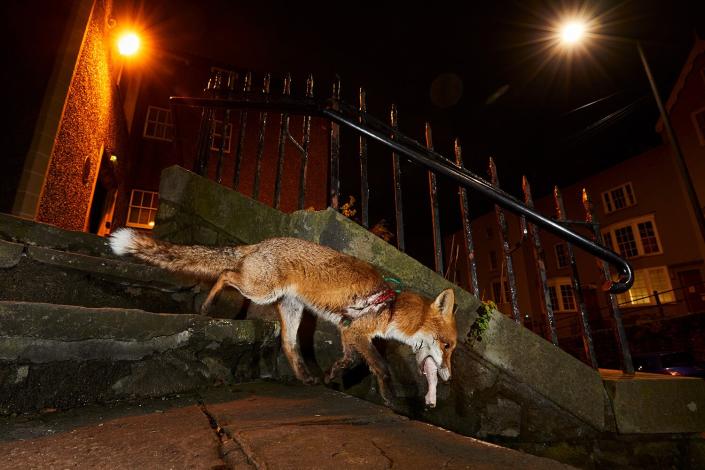
A Fox’s Tale by Simon Withyman
Wildlife Photographer of the Year People’s Choice Award Shortlist – A fox’s tale by Simon Withyman, UK
Simon Withyman
Withyman shared this photo of a fox injured after getting stuck in a plastic netting barrier to show the negative impact humans can inadvertently have on animals.
To vote for your favorite finalist photo, visit the Natural History Museum’s website for the Wildlife Photographer of the Year competition.
The Geminid meteor shower has already started appearing in the night sky. It occurs between November 19 to December 24, 2022, but will peak on the nights of December 13 and 14, 2022, where you could see up to 150 an hour.
With the right astrophotography tools (opens in new tab) it’s possible to photograph shooting stars on any night of the year. But meteor showers like the Geminid bring lots of opportunities for stunning night sky photography (opens in new tab). Keep your camera ready if you want to catch a glimpse of this stunning shooting star display, and read our tips below to get the best meteor shots.
We’ve mentioned that the Geminid meteor shower will start in the next week, but what exactly is the shower, and when is the best time to photograph it?
What is the Geminid meteor shower?
A meteor or ‘shooting star’ is essentially just dust. Earth’s orbit of the Sun often takes it through stacks of debris left in the solar system by comets and asteroids. Mostly it’s just dust particles – no bigger than grains of sand – that Earth’s atmosphere slams into. As it does, these particles energize briefly and become disintegrating meteors.
Royal Museums Greenwich (opens in new tab) shares that, apart from the Quadrantids, the Geminids are the only major meteor showers not originating from a comet. As Space.com explains (opens in new tab), “the Geminids are the product of an asteroid. The reliable shower produces bright meteors associated with the asteroid Phaethon, a strange blue rock that acts like a comet.”
Although the Geminids are thought to be getting brighter each year, this year they’ll have to compete against interference from bright moonlight, which could make them harder to see and photograph.
(Image credit: Skarie20)
When is the Geminid meteor shower?
As mentioned already, the Geminid meteor shower has already started appearing in the night sky. It is generally a reliable annual shower, and in 2022, it will peak on the nights of December 13 and 14.
How to photograph the Geminid meteor shower
A meteor shower typically only lasts a split-second – though occasionally as long as a second – as it streaks across the night sky. That doesn’t give you enough time to react to it, so your camera’s shutter needs to be already open, ready, and waiting for the light from a shooting star to hit its image sensor. That means you’ll need to use long exposures of up to 30 seconds or beyond.
If you’ve never done any after-dark shooting before, you might like to start by reading out beginner’s guide to photographing the night sky (opens in new tab).
The right location
In terms of location, picking a site with little light pollution is important because you’re going to be opening the shutter for at least 25 seconds, so a lot of light is going to get in. This interactive world light pollution map (opens in new tab) and the Dark Site Finder (opens in new tab) are both very useful for scouting a good location away from the bright lights of urban areas. However, if you can’t travel outside a city, you can still try to photograph shooting stars. Find somewhere where no streetlights are going to interfere with your composition, and get your camera into the shadow of a building.
• Read more: How to capture star trails
Although the darkest skies are between midnight and dawn, the radiant of the Perseids – the constellation of Perseus – is ‘up’ right after dark in the northern hemisphere, so you can start looking for shooting stars right away. Or, while you wait for the night skies to darken, you could try to capture a beautiful crescent moon just above the southwestern horizon before it leaves the sky.
The right gear
You’ll need a DSLR or mirrorless camera to capture meteors (Image credit: Canon)
(opens in new tab)
Our best astrophotography tools (opens in new tab) buying guide has you covered for all the gear you’ll need to photograph the Geminid meteor shower this year. However, here’s a quick overview for the key kit you’ll need…
Full-frame camera
You can use any DSLR (opens in new tab) or mirrorless camera (opens in new tab) as long as it has a manual mode, and you can shoot long exposure images for at least 30 seconds. However, one of the best full-frame cameras (opens in new tab) is the best option because it will capture more light and feature less image noise when used at high ISOs.
Wide-angle lens
Since you want to capture as much of the night sky as possible to maximize your chance of capturing shooting stars, a wide-angle lens is best. The best lenses for astrophotography (opens in new tab) have an effective focal length of between 10mm and 28mm.
Tripod
Keeping your camera steady is an absolute must for long exposures, so you’ll need the best tripod (opens in new tab) you can get. If it’s windy, don’t use the tripod’s extension arm. Check that the horizon is level before taking a shot.
Other gear
A shutter release cable (opens in new tab) that can be locked, or an intervalometer or remote control, will be helpful for taking repeated long exposures without having to manually depress the shutter button every 25 seconds.
The right composition
Although it’s tempting to point your camera at the radiant, meteors can just as easily appear anywhere in the sky.
By pointing at the radiant you’ll likely miss as many meteors as you’ll catch, so it’s better to get something interesting in the foreground – perhaps an old barn, a tree, or a sculpture – in your composition to add interest. That way you’ll have a beautiful landscape photo that will hopefully feature a shooting star or two.
Taking the shot
With your lens’s focus set to infinity, and its aperture to around f/2.8 (or as open as possible), choose ISO 800 or ISO 1600 (or even higher if you’re in a really dark sky site) and fix the shutter speed to 25sec. Take the shot, and if you’re not happy with result as a stand-alone image, make adjustments and re-take.
Once you’re happy, here comes the fun bit; take the same shot 50-200 times in Raw over the course of an hour, or a couple of hours. Just be careful not to switch-on any lights, or nudge your tripod during the shooting period; keep dark and stand well back.
Either way, you’ll end up with hundreds of shots of the night sky, some of which will hopefully have shooting stars within them. If that’s all you’re after, you can extract the images that do feature a shooting star and ditch the rest. However, if you use the free software StarStaX (opens in new tab), you can drag-and-drop all 200 photos into it to create a star-trail (opens in new tab) image … featuring shooting stars, of course. It’s also possible to do this on Adobe Photoshop.
Enjoyed this article? You might also like these astrophotography tips, tricks and techniques (opens in new tab), as well as the best star tracker (opens in new tab) camera mounts.
Settings for night photography or low light images can be one of the trickiest tasks to master in photography. Shooting pictures in the dark requires you to understand low light photography settings. But no worries! I’ve done the work for you. I’ve researched and written down all the tips and tricks for you to produce stunning pictures after dark and in low light situations.
Before We Talk Low Light Photography Settings
Let’s talk photography tips in general
If you have little to no experience shooting pictures after dark, the first thing you will want to learn is how to use your camera in manual mode. Using manual mode will help you understand aperture, ISO, and shutter speed, critical information when taking night photos. Once you know the exposure triangle, you will have a lot of room to learn how to manipulate your settings for night photography.
Manual Mode: One Tool To Give You Control of Your Camera
More Info: Learn about image stabilization, camera shake, focus, and motion blur in 3 Simple Reasons Your Photos Are Blurry
5 Steps to Get the Most From Your Fancy Camera
And a FREE Settings Cheat Sheet!
Yes, please! Send me the goods! Loading…
Thank you!
You have successfully joined our subscriber list. Please check your email inbox!
Low Light Photography Settings for Beginners
Now that you have practiced mastering manual mode, you can begin to understand how to use your camera settings for night photography. Taking pictures in the dark doesn’t have to be difficult if you know where to begin. To get started, check out Everything You Ever Wanted to Know About Nighttime Photography, where we talk about basic landscape photography along with photography camera settings.
Everything You Ever Wanted to Know About Nighttime Photography
Settings for Night Photography When Shooting Star Trails
Learning how to take pictures in the dark without a flash can seem impossible. Of course, it will take some trial and error to get everything working just right, but with the right skill and a starting place for settings, your results can be stunning! Sky photography is one of my favorites. You will want to have a wide-angle lens for night sky photos.
We spend plenty of time at our family cottage in the summer. Although this area isn’t completely clear of light pollution, it does rank decently on the dark sky map. www.darksky.org. I love looking up at the night sky and seeing the many, many stars high up over the water. Of course, there are a few too many trees for my taste, but they make a nice frame for beautiful star trail photos.
Check out the low-light photography settings in 5 Simple Steps for Photographing Stars and Star Trails. With these tips, including info on bulb mode and a longer shutter speed, you’ll be off and running, taking pictures in the dark, including gorgeous star trails of your own!
More Info: Learn about wide aperture, maximum aperture, and fast lenses in 5 Things Your Camera Won’t Tell You About Aperture Blades and F-Stops
For pictures in the dark of the Milky Way
The Milky Way is amazing, isn’t it!? She is so mysterious, and just about everyone loves a beautiful image of the milky way in the night sky. Of course, you must be a bit of a night owl to capture the milky way in pictures in the dark. Go on my adventure through the dunes with a new friend who taught me all about taking Milky Way photos and other low light photography settings. Are you starting to see that the camera settings for night photography are all reasonably similar? It begins with a slow shutter speed and a solid tripod.
How to take Milky Way Photos and other Events in the Sky
Low Light Photography Settings and Other Prep Work
Everyone loves to have a quick answer! Can’t I jot down some settings for night photography and be ready to take amazing pictures in the dark? Of course you can, but don’t underestimate the importance of the other prep work you’ll want to do before heading out the door. When you want to shoot like a pro, you do a big part of the work before leaving your home or office. Check out five simple tips for shooting pictures in the dark in Shoot like a pro using the Best Settings for Night Photography.
Shoot like a pro by using the Best Settings for Night Photography
You have successfully joined our subscriber list. Please check your email inbox!
Pictures in the Dark of Stunning Fireworks
One of my earliest experiences trying to take pictures in the dark was at my local Independence Day Celebration. I tried and tried with my camera on auto mode, and I could not understand why my photos would not turn out. Once I mastered manual, I was off and running. Some of my favorite images are of fireworks. And it’s so easy! You won’t believe it! Here’s a hint: can you believe you start at ISO 100? You can use a lens of any focal length, but you’ll want to make sure you can get back far enough to get the firework trails in your image.
Take a look at some of my best firework images and get the easy formula for capturing them in How to Capture Epic Firework Photos with The Best 6 Tips. You will even find a free cheat sheet to print out and tuck in your camera bag.
How to Capture Epic Firework Photos With The Best 6 Tips (+ Free Cheat Sheet)
Settings for Night Photography for those with Extra Patience
If you are a regular reader, you know that I live close to Lake Michigan, in Holland, Michigan. We have a gorgeous Lighthouse not far from my home that I love to photograph. One of my earliest adventures in taking pictures after dark was photographing Big Red. https://veronicajunephotography.com/seven-beautiful-portraits-of-big-red-lighthouse-that-will-inspire-you/ I learned so much from a local photographer who I admire. He was kind enough that evening to mentor me and teach me some new tricks for night photography. Enjoy those tricks in An Adventure in Lighthouse Photography.
It may be easy to assume that the most crucial tip for shooting in low light conditions would be to use slower shutter speeds, but you would be missing out on so much more. Reading through these tips will help you know when to use a higher ISO or a lower ISO, what equipment you need to get excellent results, and how to plan by researching location, times, and what to bring with you. Remember these five tips when you’re shooting pictures in the dark, and you’ll be ready for the perfect shot (with lots of practice, of course).
1. Plan and be ready with the correct time and location.
2. Pack the correct equipment for your nighttime adventure. Don’t forget safety and sustenance!
3. Take some notes and understand where you will need to begin with your settings.
4. Print out any helpful photography tutorials with night photography tips, so you can refer to them while you’re shooting. Now is an excellent time to remind you to bring a dim or red bulb flashlight.
5. Have fun! Be Safe! I hope you will show off your results in my Facebook Group HERE.
I would love to know how I can improve this blog for my readers. Would you mind taking this short anonymous survey to share your thoughts?
If you liked this article, you’ll probably like these, too!
I’ve been a Nikon shooter since I picked up my first DSLR, the entry level D3300, in 2016. At the time, it came down to price: Canon and Nikon were about the same quality as far as still images went, and mine was the cheaper kit. But I liked the ease of the menu system and the results I got from the camera, so I kept on using Nikon cameras. I’ve since upgraded to the D750, and loved it for the past few years.
Fast forward to now and the Nikon mirrorless system. The company’s new Z30 is a compact, crop-sensor mirrorless camera body—basically a better version of my D3300 from back in the day. With its size and available accessories, it’s immediately apparent who Nikon wants to sell this camera to: aspiring content creators looking for a relatively cheap way into the YouTube/TikTok sphere.The last time I had anything like it was when I used a Sony point-and-shoot digital camera with around eight megapixels of resolution, so I was curious to see if the Z30 could win me over.
Read more
I tested this camera in multiple scenarios, from street shooting to nature photography, and in a variety of lighting conditions. Most of the time, the camera was set to manual mode with auto-ISO, meaning I controlled the aperture and shutter speed and the camera decided which ISO setting to use—unless I wanted to achieve a certain look, then I controlled the ISO sensitivity myself.
I shot my still images on the highest quality setting, RAW files. I also shot video at the highest possible quality for this camera, which is 4K at 30 frames per second (fps). I was very impressed with both.
For its target audience of beginning content creators, I’d say it delivers: right now, you can get a two-lens “creator kit” from Nikon for around $1,000.00, which includes the camera body, two decent lenses, a tripod, Rode external mic, and remote. That’s just a little more expensive than single-lens kits for the Sony ZV-E10 or Canon R 10. If you’re buying just the body and kit lens, though, the price is almost the same across the spectrum for this category of camera—all of them cost around $800.
Design
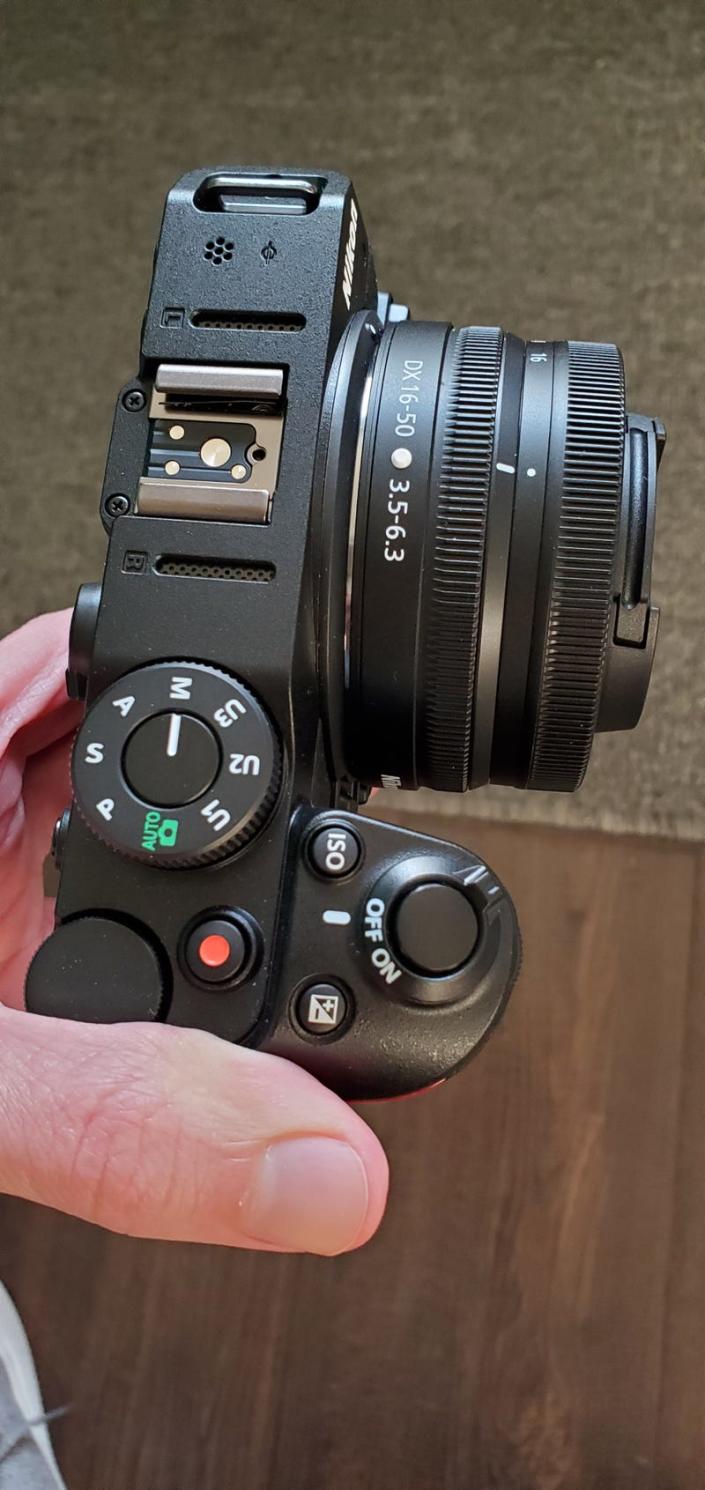
Mirrorless camera controls
The ergonomics of the Z30 are typical Nikon. It’s got a deep grip you can hold onto that feels good in the hand, the shutter button and on/off switch are where you’d expect them to be, and relevant buttons/dials are usually within range of your thumb and index finger.
Despite its size, this camera feels substantial. It’s got a good weight in the hand and the included neck strap is just fine for carrying it around. I didn’t find it getting in my way too much when out and about shooting, though if I were keeping it for the long haul, I’d probably invest in a wrist strap.
One thing about this camera some people probably won’t like is that it has no viewfinder. Instead, you use the back LCD screen. That’s normal for a mirrorless setup, but if you’ve only ever shot with a DSLR, it’s like always using live view to shoot. It took some getting used to, but I didn’t mind it, especially since I know I’d never use this camera to shoot more than personal photos for fun or videos for social media.
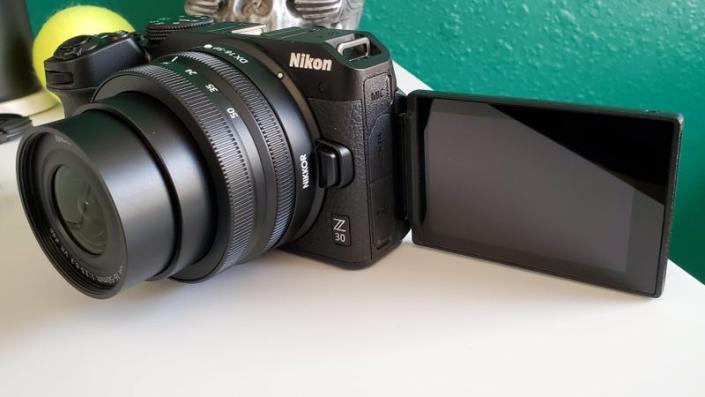
The back LCD screen tilts all the way out and flips around, perfect for vlogging. Out of the box, it’s set to enter “self-portrait mode,” which is when you flip the screen around to see yourself while holding the camera. It uses eye autofocus to find its subject, and you can either press the shutter or tap the screen to take a photo with a three-second timer. Of the test selfies I took with this mode on, most of them were in focus and sharp, though the camera did miss focus a couple of times.
As a DSLR shooter, I primarily used the manual d-pad to navigate the camera menu, but slowly got used to the touchscreen controls and was using them both by the end of my time with it. You can set the autofocus to off, tap-to-focus, or focus-and-shoot, all with a tap of the LCD screen. Aperture and ISO can also be changed via touchscreen, too. I found it quicker and more efficient to just use the click-wheel for those, but by the time I finished with this camera, I was using a balance of manual buttons and the touchscreen and had zero problem with it. Later model DSLRs like the Canon 5D Mk IV and D850 already had touchscreens, albeit not as sensitive, so this seemed like a natural progression.
There’s a hot shoe on top—a bracket that allows you to attach external, battery-powered accessories to the camera—for attaching accessories like a flash or high-end mic, something you don’t often see on APS-C cameras. The Z30 comes with a built-in stereo mic that sounds surprisingly good. You can configure it a few different ways to filter out some ambient noise and focus more on the range of your voice. It’s not the same as a fancy studio mic, but more than adequate for beginners looking for a run-and-gun vlog camera they can set to auto and use right away. For a look (and listen) at how every setting with the Z30’s internal mic sounds, check out this video from Noel Guevara.
You also get the standard mic input jack on the side, as well as a mini HDMI port and USB-C connection for charging. The battery compartment is also the memory card compartment, with space for a single SD card.
There’s also a tally light on the front of the camera body to let you know when video is recording, a must if you’re filming yourself.
Stills
The Z30 is a mirrorless APS-C camera, meaning it has a smaller sensor than more expensive, feature-rich offerings like the Z6II, Z7II, and Z9. But that doesn’t mean the image quality is bad.
The 21-megapixel sensor is just slightly lower resolution than my 24.6-megapixel full-frame DSLR, the Nikon D750. Its autofocus is, without a doubt, superior to the D750’s, which isn’t surprising as it was just released in 2022 and the D750 came out in 2014.
Images were sharp and detailed, with dynamic range slightly surpassing my D750 even in lower light scenarios. I was sent the camera body with Nikon’s 15-50mm kit zoom lens, among the most basic lenses they have, and the quality of what I shot was still on par with my D750.
I was a bit limited by the aperture range of the lens—3.5 at the wide end of 15mm to 6.3 at the closer range of 50mm—so my ISO had to crank higher in certain scenarios than if I were using a faster lens with a wider aperture like f/1.8 or f/1.4. That said, images up to around 1000 ISO were still eminently usable, especially once I took down the noise in Lightroom. Noise was still present, but looked more like film grain than digital noise. If I’d had, say, a Nikkor 35mm 1.8 Z lens attached to this body, I think the results would’ve been top notch. The image below was shot at 1000 ISO and cleaned up in post:
Photo of a car
Everything about shooting with the Z30 reminded me of an upgraded version of my trusty D3300. Color reproduction was good, and sharpness was more than what I expected to get from a cheaper kit lens.
There’s even an option for time-lapse photography that I unfortunately didn’t get to use, but sounds fun to mess with, especially for shooting something like a waterfall landscape or star trails.
Subject tracking for photos was adequate, though I wouldn’t suggest using this camera for sports or fast action. Selfies were mostly sharp, and a bee perched on a plant stayed mostly in focus when I took a few rapid burst shots as the plant blew in the wind. Truly silent shooting was also something that was great to have when I took this camera out on the street to take photos, though I found myself wanting a faster lens so I could let more light in to crank my shutter speed higher and better freeze the action of the people walking by.
The wide-angle end of the kit lens makes it amazing for architectural photography, though, and I got some great shots walking through downtown Houston. The Z30’s battery also held up very well, with hardly a dent after around an hour of shooting on a full charge.
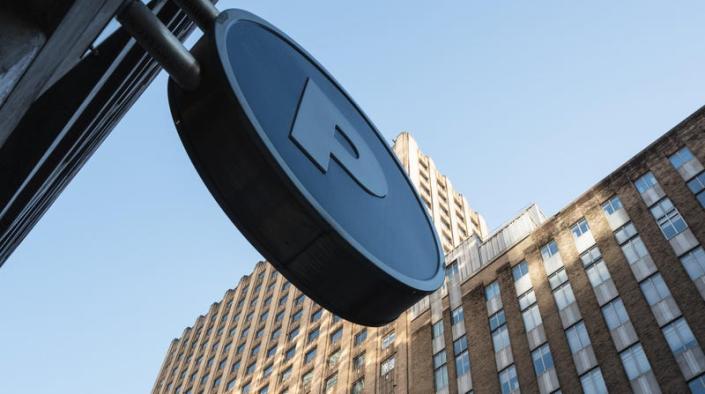
Parking sign in front of a building
All in all, a very respectable still camera, especially for the price point, that can perform above its weight class when paired with a good prime lens.
Video
The video files from this camera look great. I recorded a bunch of clips in 4K while out and about and they look crisp, with good color. While slow-mo isn’t an option in 4K, you can record slowed clips that still look plenty good in 1080p. As video isn’t my forte, I kept the camera in auto mode most of the time I was recording—and the clips still looked great on social media.
kinjavideo-193154
Indoors at night, some noise did start showing up in the footage at higher ISO settings, but that’s more because of the lens I was using. If I had something that went to f/1.8 or higher, I don’t think low light recording would’ve been as difficult. Nikon’s standard 35mm f/1.8 lens ($699) or third party lenses like the Viltrox 14mm 1.4 ($329) would both be great options for that.
Eye-tracking autofocus was spot on in video mode, locking onto my eye and never losing focus when the camera was pointed my way despite me moving it around pretty erratically and zooming in and out with the kit lens while focus was locked on my eye.
The Z30 doesn’t have in-body image stabilization (IBIS), using digital stabilization similar to your smartphone camera instead. However, the kit lens I paired it with did have vibration reduction (VR), and with the two of them together, the footage was pretty smooth.
kinjavideo-193155
If you prefer to color grade your footage, you can set video recording to the “flat” color profile in the video recording menu, but the more cinematic log profiles of fancier cameras aren’t available at this price point. Again, auto mode is more than accurate the majority of the time, but this camera can certainly be used as a budget indoor studio cam for YouTube videos and the like.
For an idea of what it looks like to use this camera with a good lens, pro lighting, and a better mic, check out this video from photographer and YouTuber Jared Polin, where he tests a pre-production version of this camera in his studio.
I recorded everything in the max resolution of 4K at 30fps while testing this camera. 25 and 24 fps are also available, and you can record slow-mo footage in 1080p at 120 fps, which still looks great on Instagram, TikTok, or YouTube. The better your lens, the crisper your footage will look, but the kit lens held up well.
Drawbacks
As I said above, I would’ve liked an electronic viewfinder with this camera. It’s definitely not a dealbreaker, but does take some getting used-to.
Some of the controls felt clunky at times. To switch back and forth from auto ISO mode, for example, you have to hold down the ISO button on the top of the camera and turn the front click-wheel at the same time, which felt awkward. I found myself accidentally pressing buttons when picking up the camera; luckily, it was pretty much always off when that happened.
Charging the camera was also a little annoying. It doesn’t come with a wall wart, just a USB cable, so you’re stuck relying on something like a computer if you don’t have a spare sitting around. But the cable stopped transferring power anytime my computer went to sleep, so I couldn’t leave it connected overnight for a long charge. I ended up using the charger from my Android phone, which has the same USB-C connector, and that worked fine.
There’s also no percentage readout for the battery, so you’re left guessing a bit as to how much power you’ve got left. There’s just a three-bar battery symbol on the LCD screen, which has a tendency to go from mostly full to mostly empty pretty quickly. Nikon estimates around 75 minutes of shooting time at 4K 30fps, and DPReview got 65 minutes in the wild, so that seems to track.
The first time I took this camera out, it got low very quickly. The battery read full but dissipated after less than an hour of shooting stills and video. However, when I carried this camera around shooting stills for over an hour on a full charge, it didn’t seem to put a dent in the battery, so I’d estimate you can get two-three hours of photo time out of this camera easily.
Nikon Z30 Mirrorless Camera
Should I buy the Nikon Z30 Mirrorless Camera?
All in all, I couldn’t find much not to like about this camera. It’s very entry-level, but can stretch beyond that with the right tools. Will this be your go-to wedding photography shooter? No. But as long as you take it for what it is—a fun camera that’s main strength is run-and-gun video—you won’t be disappointed. In fact, you might be pleasantly surprised. It has a couple advantages over its closes competition, the Sony ZV-E10, that would make me choose it over the Sony if I wanted a vlogging camera: the ability to record 4K at 30fps without a crop, and the simplified “flat” color profile that makes footage easier to grade later on.
This camera’s strength is its ability to deliver a lot of quality for the price point in an easy-to-use package. I’d recommend it as a vlogging camera for a beginning YouTuber, or if you’re looking for something cheap to take traveling, or if you want to try out mirrorless without spending a ton of cash.
More from Gizmodo
Sign up for Gizmodo’s Newsletter. For the latest news, Facebook, Twitter and Instagram.
The concept of time has always fascinated photographers. “Photography takes an instant out of time, altering life by holding it still,” said Dorothea Lange. The American photojournalist was best known for her Depression-era work during the 1920s in the United States, capturing the gaunt and haunted images of families on the verge of starvation.
In some ways, it’s easy to see the impact of time on ravaged faces. But it’s much harder to see the impact of time on landscapes, landmarks and buildings.
Today, photographers have turned to all sorts of methods to expand the moment and to encapsulate more than just the one second in which the shutter clicks.
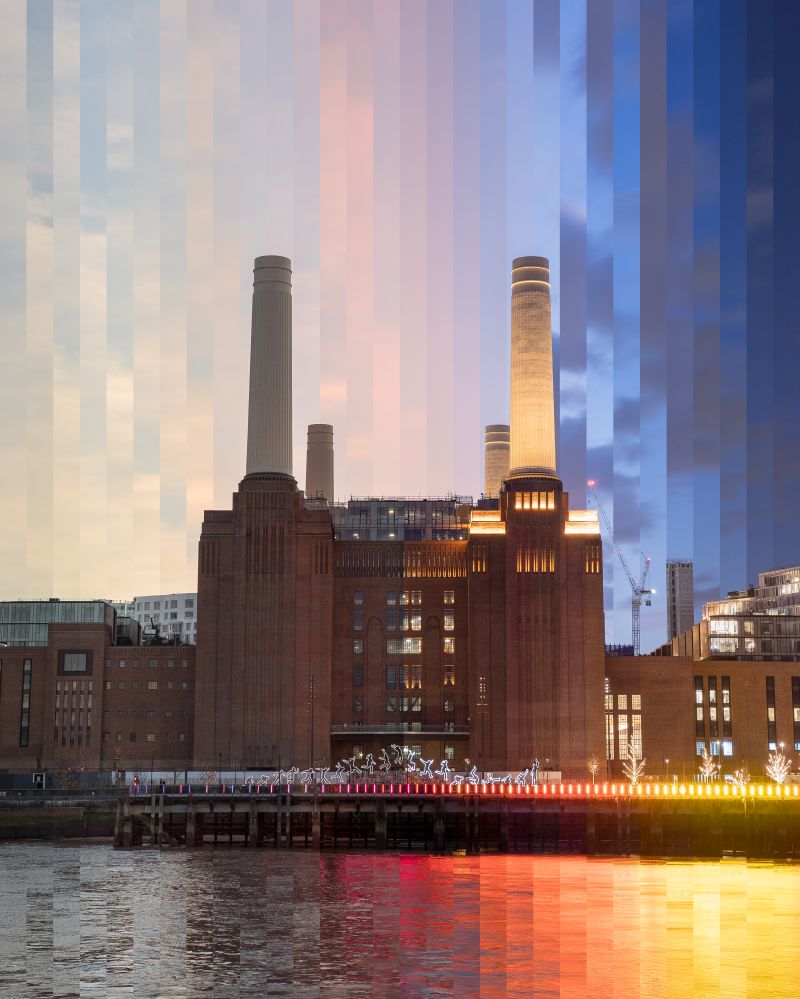
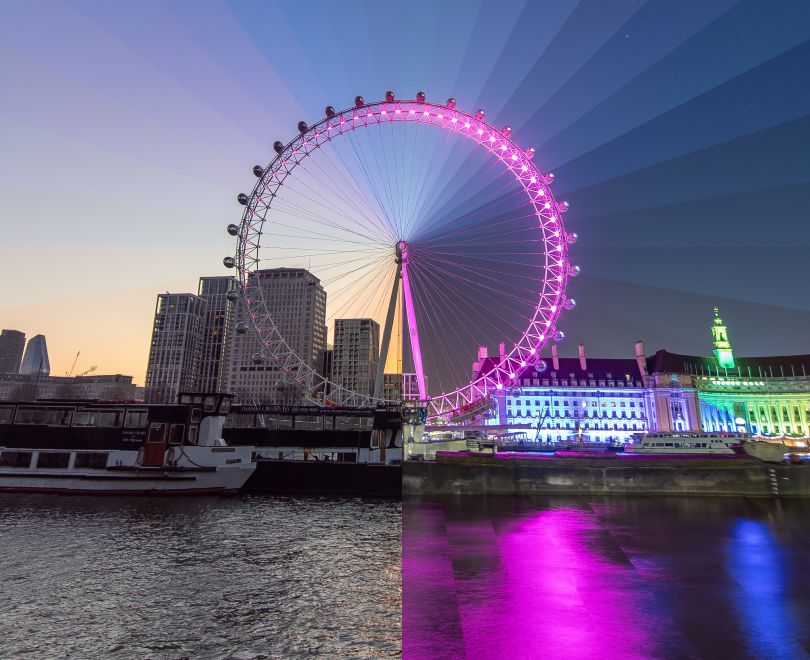
Time-slice photography is used as a tool to capture the motion, pace and atmosphere of the subject. We often think of photography as capturing a single moment, but a time-slip image shatters this illusion by showing a person, place or thing over minutes, months or even years in one picture.
In the early days of photography, cameras struggled with capturing a sharp image, given the limitations of shutter speeds and types of lenses. Nevertheless, early photographers were fascinated by movement and the ability of a photograph to capture a ‘true’ likeness of a person or landscape.
Perhaps the earliest instance of time-slice photography was in the attempts made by Eadweard Muybridge and his study of movement. His most famous image was taken in 1878, of a horse in motion, which captured on film for the first time that a horse actually ran with all four feet off the ground at one part of a gallop, which was a revelation at the time. Muybridge’s work opened up new possibilities and expanded what we could see.
Photographer Matt Keneally took up time-slice photography to enhance his creative process. He started his career as a designer but now dedicates all of his efforts to time-slip photography.
The sense of time and of ‘now’ is questioned by Keneally in his images of the urban environment, as well as the movement and motion surrounding buildings and landscapes. His definition of time-slice photography is “when you take a series of photos over a few hours and then, in post-production, slice them together to show the passing of time in one single image.
“It’s a time-lapse without the video, showing the passing of time in a single image. I like having a still image; I feel people can stay with it longer.”
His photography equipment includes a Sony A7R Mark II, which is mirrorless. “You get a bigger frame to work with, more detail, bigger sensor, bigger pixels,” Keneally explains.
As the name suggests, mirrorless cameras capture images without using a mirror in the camera body. This is the main difference with DSLR cameras, which reflect images into viewfinders via mirrors. Mirrorless cameras use electronic viewfinders (EVF) to display images digitally.
The photographer is happiest standing out in all kinds of inclement weather, often for hours to shoot his time-slices. Kenneally often has to return again and again to the location if he doesn’t feel he has captured the image he wants.
“I can spend up 3-4 hours at a time trying to capture the changing of time, especially from day to night, or the twilight hour, with its dramatic light shift.
“A lot of people think it’s a bit weird, but I used to be an astrophotographer before. I used to sit all night out in the cold, so this is a bit of an upgrade.”
At first, photography was just a hobby, and he was content to play around with his first camera in 2009. However, the obsession grew until it completely took over his life and became his full-time career for 13 years.
“I was looking for something a bit different. I was bored of taking standard landscape photography. I remembered this technique called time-slice that I tried a long time ago. I was rubbish at it, but I thought I would give it another go. Now, I don’t know how to do anything else.”
His favourite part of time-slice photography is putting the image together and then finally seeing the finished image in post-production. Several different versions of a single image can be created by choosing a different photo, which results in varying results.
Talking about his time-slice image of the London Eye, Keneally found it one of the most challenging due to bad weather and the wheel’s constant motion. “It was a nightmare to shoot and took seven attempts to get right. The weather conditions can change and completely ruin the shot or not achieve the effect you’re after.”
However, it was well worth the effort as his images were published in Digital Camera World. Not surprisingly, Keneally has also chosen the Prime Meridian at Greenwich to shoot. Since the late 19th century, this location has served as a reference line for GMT (Greenwich Mean Time).
The photographer felt it was the right place to show the passing of time. The time-slice image was made over two hours and 30 minutes.
Keneally now has a number of limited prints for sale on his website. A new book is in the pipeline for next year, which will have a collection of new images, not just his London landmarks.
He is moving forward and exploring new themes. “The last shot I did was of the Houses of Parliament. I think I’m done with that. Next year I want to move on to shots other than standard landmarks. I want to move away from the digital and more into books and prints. Anything that distracts people from their phones for a while will be worth it.”
The “Blue Marble” image from Apollo 17 is one of the most iconic images in history. (credit: NASA)
by Chari Larsson Monday, December 12, 2022
December 7 marked the 50th anniversary of the Blue Marble photograph. The crew of NASA’s Apollo 17 spacecraft—the last human mission to the Moon—took a photograph of Earth and changed the way we visualized our planet forever.
By removing the graticule—the grid of meridians and parallels humans place over the globe—the image represented an Earth freed from mapping practices that had been in place for hundreds of years.
Taken with a Hasselblad film camera, it was the first photograph taken of the whole round Earth and is believed to be the most reproduced image of all time. Up until this point, our view of ourselves had been disconnected and fragmented: there was no way to visualize the planet in its entirety.
The Apollo 17 crew were on their way to the moon when the photograph was captured 29,000 kilometers from the Earth. It quickly became a symbol of harmony and unity.
The previous Apollo missions had taken photographs of the Earth in part shadow. Earthrise shows a partial Earth, rising up from the Moon’s surface.
In Blue Marble, the Earth appears in the center of the frame, floating in space. It is possible to clearly see the African continent, as well as Antarctica’s south polar ice cap.
Photographs like Blue Marble are quite hard to capture. To see the Earth as a full globe floating in space, lighting needs to be calculated carefully. The sun needs to be directly behind you. Astronaut Scott Kelly observes that this can be difficult to plan for when orbiting at high speeds.
Produced against a broader cultural and political context of the “space race” between the United States and the Soviet Union, the photograph revealed an unexpectedly neutral view of Earth with no borders.
Disruption to mapping conventions
According to geographer Denis Cosgrove, the Blue Marble disrupted Western conventions for mapping and cartography. By removing the graticule—the grid of meridians and parallels humans place over the globe—the image represented an Earth freed from mapping practices that had been in place for hundreds of years.
The photograph also gave Africa a central position in the representation of the world, whereas Eurocentric mapping practice had tended to reduce Africa’s scale.
The image quickly became a symbol of harmony and unity. Instead of offering proof of America’s supremacy, the photograph fostered a sense of global interconnectedness.
Since the Enlightenment, mapping and map making had emphasized man’s superiority over the Earth. Working against this hierarchy, Blue Marble evoked a sense of humility. Earth appeared extremely fragile and in need of protection. In his book Earthrise, Robert Poole wrote: “Although no one found the words to say so at the time, the ‘Blue marble’ was a photographic manifesto for global justice.”
The “2002 Blue Marble” was a composite based on images from Earth science satellites. (credit: NASA/Robert Simmon and Reto Stöckli)
Blue Marble’s afterlives
It is impossible to examine Blue Marble and separate it from the urgency of today’s climate crisis.
It quickly became a symbol of the early environmental movement, and was adopted by activist groups such as Friends of the Earth and annual events such as Earth Day.The photograph appeared on the cover of James Lovelock’s book Gaia (1979), postage stamps, and an early opening sequence of Al Gore’s An Inconvenient Truth (2006).
Advances in technology might help explain the photograph’s enduring charm from the vantage point of 2022. The first photograph of our planet was remarkably lo-fi.
The ways we have viewed and visualized Earth have changed over the decades. Starting in the 1990s, NASA created digitally manipulated whole-Earth images titled Blue Marble: Next Generation, in honor of the original Apollo 17 mission. These are composite images composed of data stitched together from thousands of images taken at different times by satellites.
Space-based imaging technology has continued to advance in its capacity to render astonishing detail. Art historians such as Elizabeth A. Kessler have linked these new generation of images picturing the cosmos with the philosophical concept of the sublime.
The photographs create a sense of vastness and awe that can leave the spectator overwhelmed, akin to 19th century Romantic paintings such as Thomas Moran’s The Grand Canyon of the Yellowstone (1872).
In 1995, the Hubble Space Telescope revealed mountains of gas and dust in the Eagle Nebula. Known as the Pillars of Creation, the image captures gas and dust in the process of creating new stars.
Earlier this year, NASA released the first images taken by the James Webb Space Telescope. Building on Hubble’s discoveries, JWST is designed to visualize infrared wavelengths at an unprecedented level of clarity.
These advances in technology might help explain the photograph’s enduring charm from the vantage point of 2022. The first photograph of our planet was remarkably lo-fi. Blue Marble is the last full Earth photograph taken by an actual human using analogue film: developed in a darkroom when the crew returned to Earth.
This article is republished from The Conversation under a Creative Commons license. Read the original article.
Chari Larsson is a senior lecturer of art history at Griffith University in Australia.
Note: we are using a new commenting system, which may require you to create a new account.